Basic Serverless Typeahead Search with Cloudflare Workers

Typeahead search progressively searches and filters as the user types his/her query. It’s also called predictive search, incremental search or search-as-you-type and is an important feature of most search engines. In this tutorial, we’ll learn to make a very basic version of a Pokémon Typeahead Search using Cloudflare Workers and React. Cloudflare provides generous 100,000 requests per day in its free plan, making it perfect for an API like this.
Setup Cloudflare
We begin by signing up for a Cloudflare Workers account at workers.cloudflare.com.
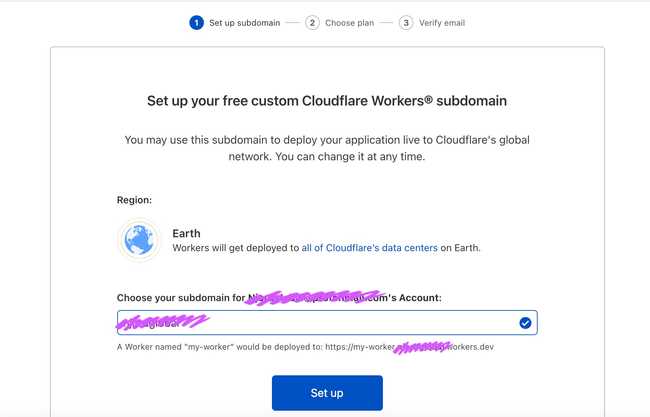
In the onboarding screen, select a unique subdomain for our workers.
Installing Wrangler
To get the most out of Cloudflare Workers we need to install Wrangler CLI using yarn or npm.
yarn global add @cloudflare/wranglerNext we login to our Cloudflare Account with Wrangler CLI
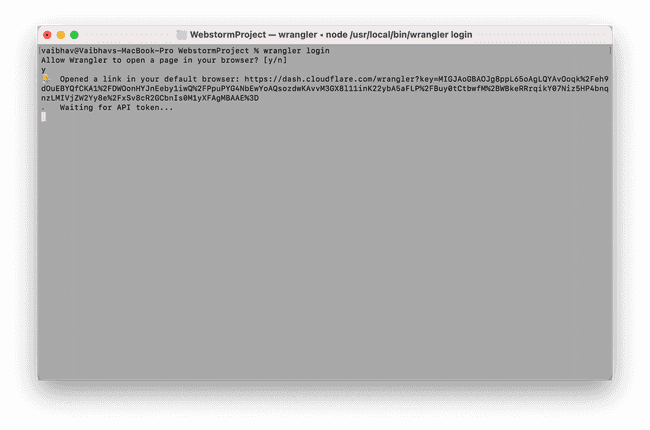
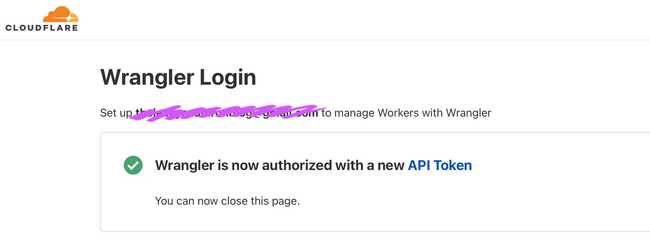
wrangler loginThis will open up a page on your browser where you can authorise the wrangler.
If it doesn’t work, you can manually log in using the config command and following the prompted instructions.
wrangler configSetup A Worker Project
Wrangler CLI lets you set up a Cloudflare Worker project easily, as well as allows you to use Templates.
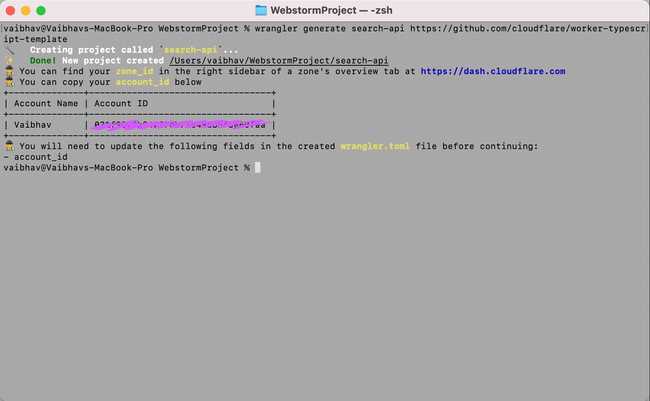
We’ll be using the TypeScript template for our project. To set it up just use the following command.
wrangler generate search-api https://github.com/cloudflare/worker-typescript-templateNext, navigate to the project and open it using your favourite IDE and we can start writing the serverless code.
But, before we begin to write our API, we need to add our accound_id in the project’s wrangler.toml file, as prompted while generating the project.
Writing the API
For our search to work there needs to be an index where our data is stored, here we’ll be using a JSON File of all the Pokémons and their ID, that I generated using PokeAPI.
[
  {
    "name": "bulbasaur",
    "id": 1
  },
  {
    "name": "ivysaur",
    "id": 2
  },
  {
    "name": "venusaur",
    "id": 3
  },
  {
    "name": "charmander",
    "id": 4
  },
  .
  .
  .
  {
    "name": "eternatus-eternamax",
    "id": 10217
  },
  {
    "name": "urshifu-single-strike-gmax",
    "id": 10218
  },
  {
    "name": "urshifu-rapid-strike-gmax",
    "id": 10219
  },
  {
    "name": "toxtricity-low-key-gmax",
    "id": 10220
  }
]
You can download and add it to the project’s src folder as pokedex.json.
But we can’t directly import a JSON module to our typescript file, for that we need to add the following to the project’s tsconfig.json file.
"resolveJsonModule": true,Now let’s open our handler.ts file and start writing our API. We begin by importing our Pokémon Index file.
import pokedex from “./pokedex.json”Next, we get the pathname and query-string parameter from the Request object.
const {pathname, searchParams} = new URL(request.url)Then we check if the pathname is correct, else we respond with a 404 error.
if (pathname === “/search”) {

} else return new Response("", {
   status: 404,
   statusText: "Path Not Found!"
   headers: {
       'Access-Control-Allow-Origin': '*',
       'Access-Control-Allow-Methods': 'GET',
   },
})
And if the path is correct, we extract the exact query params we need to process our search:
const query = searchParams.get(“q”)Now, we write the filter for the Pokémons according to our query.
const d = pokedex.filter(
   (pokemon) =>
       pokemon.name.toString().toLowerCase().includes(query.toLowerCase()) ||
       pokemon.id.toString().toLowerCase().includes(query.toLowerCase()),
)
Finally, we return the stringified results in our Response object along with CORS headers.
return new Response(JSON.stringify(d), {
   headers: {
       'Access-Control-Allow-Origin': '*',
       'Access-Control-Allow-Methods': 'GET',
   },
})
Completed code should look like this:
import pokedex from './pokedex.json'


export async function handleRequest(request: Request): Promise<Response> {
 const { searchParams, pathname } = new URL(request.url)

 if (pathname === '/search') {
   const query = searchParams.get('q') || ''

   const d = pokedex.filter(
     (pokemon) =>
       pokemon.name.toString().toLowerCase().includes(query.toLowerCase()) ||
       pokemon.id.toString().toLowerCase().includes(query.toLowerCase()),
   )

   return new Response(JSON.stringify(d), {
     headers: {
       'Access-Control-Allow-Origin': '*',
       'Access-Control-Allow-Methods': 'GET',
     },
   })
 } else return new Response('', {
     status: 404,
     statusText: 'Path Not Found!',
     headers: {
       'Access-Control-Allow-Origin': '*',
       'Access-Control-Allow-Methods': 'GET',
     },
   })
}
Debugging and Publishing
Since this project is made with TypeScript we cannot directly run or publish it, for that we need a bundler like Webpack, which is preconfigured in the template we used.
To debug locally, we need to first run the dev script to compile the typescript.
yarn run devThen, we run the wrangler dev command.
wrangler devThis should run the script on our localhost, where we can test it out by entering the following URL in our browser.
http://127.0.0.1:8787/search?q=pika
Which should return a list of all the entries for Pikachu in our index.
[
  {"name":"pikachu","id":25},
  {"name":"pikachu-rock-star","id":10080},
  {"name":"pikachu-belle","id":10081},
  {"name":"pikachu-pop-star","id":10082},
  {"name":"pikachu-phd","id":10083},
  {"name":"pikachu-libre","id":10084},
  {"name":"pikachu-cosplay","id":10085},
  {"name":"pikachu-original-cap","id":10094},
  {"name":"pikachu-hoenn-cap","id":10095},
  {"name":"pikachu-sinnoh-cap","id":10096},
  {"name":"pikachu-unova-cap","id":10097},
  {"name":"pikachu-kalos-cap","id":10098},
  {"name":"pikachu-alola-cap","id":10099},
  {"name":"pikachu-partner-cap","id":10148},
  {"name":"pikachu-gmax","id":10190}
]
Once satisfied, we can build and publish it to our account using Wrangler CLI.
To build in production mode, run the build script.
yarn run buildThen, run the publish command.
wrangler publishFinally, the backend part of this project is complete and we can access the live API from the browser, it should be something like this.
https://search-api.<your-subdomain>.workers.dev/search?q=pikaFrontend
Although the API we made earlier is front-end agnostic, I’ll be bootstrapping the web app using Create React App.
yarn create react-app search-app --template typescriptWe’ll begin by removing App.css, App.test.ts, index.css and logo.svg (don’t forget to remove the index.css import from index.tsx file).
To demonstrate the API I’ll be using Gestalt, a React Component Library by Pinterest and Axios to fetch the data from the API, let’s add it to our project.
yarn add axios @types/[email protected] [email protected]Next, we add the Gestalt CSS file to our index.tsx
...
import "gestalt/dist/gestalt.css"
...
Then in the App.tsx file, we delete the pre-existing code, make it a fresh React Function Component and add the following code for our Search Field.
import React from 'react';
import {Box, Container, SearchField} from "gestalt";

const App: React.FC = () => {
   return (
       <>
           <Container>
               <Box flex="grow">
                   <SearchField
                       accessibilityLabel="Search"
                       placeholder="Search"
                       id="search"
                       onChange={({value}) => console.log(value)}
                   />
               </Box>
           </Container>
       </>
   );
};

export default App;
Next, we begin to build our search function by importing axios and useState, useCallback Hooks and adding the search function to the onChange attribute of Search Field.
import React, {useCallback, useState} from 'react';
import {Box, Container, SearchField} from "gestalt";
import axios from "axios";


const App: React.FC = () => {
   const [results, setResults] = useState([])

   const search = useCallback((query) => {
       axios
           .get(`${process.env.REACT_APP_SEARCH_API}/search?q=${query}`)
           .then(res => {
               const pokemons = res.data
               setResults(pokemons)
           })
           .catch(err => {
               console.error(err)

               setResults([])
           })
   }, [])

   return (
       <>
           <Container>
               <Box flex="grow">
                   <SearchField
                       accessibilityLabel="Search"
                       placeholder="Search"
                       id="search"
                       onChange={({value}) => search(value)}
                   />
               </Box>
           </Container>
       </>
   );
};

export default App;
Note that we are using an environment variable for our API, that’s just for ease but you can hard code the API if you like.
Finally, we write the code to display our results.
import React, {useCallback, useState} from 'react';
import {Avatar, Box, Container, SearchField, Text} from "gestalt";
import axios from "axios";


interface IPokemon {
   id: number,
   name: string
}

const App: React.FC = () => {
   const [results, setResults] = useState([])

   const search = useCallback((query) => {
       axios
           .get(`${process.env.REACT_APP_SEARCH_API}/search?q=${query}`)
           .then(res => {
               setResults(res.data)
           })
           .catch(err => {
               console.error(err)

               setResults([])
           })
   }, [])

   return (
       <>
           <Container>
               <Box flex="grow">
                   <SearchField
                       accessibilityLabel="Search"
                       placeholder="Search"
                       id="search"
                       onChange={({value}) => search(value)}
                   />
               </Box>

               {results.length
                   ? <Box paddingY={2}>
                       {results.map((pokemon: IPokemon) => {
                           const pokemonName = pokemon.name
                           const pokemonImage = `https://raw.githubusercontent.com/PokeAPI/sprites/master/sprites/pokemon/${pokemon.id}.png`

                           return <Box key={pokemon.id} borderStyle="sm" marginBottom={2} rounding="pill" padding={2}
                                       alignItems="center" display="flex">
                               <Box paddingX={2}>
                                   <Avatar
                                       name={pokemonName}
                                       src={pokemonImage}
                                       size="xs"
                                   />
                               </Box>

                               <Box paddingX={2} flex="grow">
                                   <Text color="darkGray" weight="bold">
                                       {pokemonName.toUpperCase()}
                                   </Text>
                               </Box>
                           </Box>
                       })}
                   </Box>
                   : null}
           </Container>
       </>
   );
};

export default App;
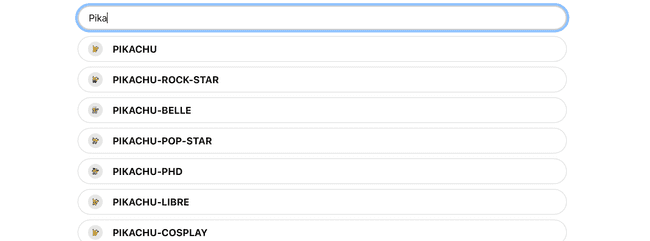
The results should look something like this.
We can deploy the react app with Cloudflare Pages or with Cloudflare Workers as well.
